Build Wordpress Pages Individually Drag and Drop and Upload to Wordpress
Themeisle content is free. When y'all purchase through referral links on our site, we earn a commission. Learn More
The drag-and-drop content building game has become really popular in the recent years.
For instance, if y'all go to CodeCanyon and do a quick search for "drag and drop," you get this:

That'due south more than than 220 plugins responding to the elevate-and-drop search query! And permit'south not forget that CodeCanyon isn't the be-all end-all of WordPress plugins. At that place are many other drag-and-drib plugins available on third-political party websites and in the official plugin repository.
Then what practise y'all practice when you lot want some drag-and-drib content building magic?
Well, if you've got money to invest, like I said, there are multiple premium plugins (some of them we talked about in i of our review/comparisons). Likewise, you lot can opt for a more integrated solution and cull a whole WordPress theme that already has some drag-and-driblet functionality built in (we have a list of those for you lot besides).
But.
Today, permit's keep things free!
Here'south our guide on how to create an awesome landing page in WordPress with a free drag-and-drib content architect.
The demo
Let's start with the fun part. Here's an example of what's bachelor in the elevate-and-driblet realm with no investment any:
Nothing besides complex, granted, but information technology's too nothing similar the default setup that WordPress allows you to do.
Just to list some absurd details about that little demo page:
- no sidebar,
- total-width hero section,
- multi-column layout,
- columns of dissimilar widths,
- custom headings,
- fully responsive structure.
So … you lot're probably wondering:
How to create a landing folio in WordPress with elevate-and-drop
Outset things showtime, we're going to utilize two plugins to make all of that happen.
- The first 1 is the SiteOrigin Page Builder plugin forth with its boosted bundle of widgets.
- (SiteOrigin has actually been pointed out every bit the all-time free solution on the market in our comparison of the top drag-and-driblet content building plugins for WordPress.)
- The second one is the Shortcodes Ultimate plugin.
- (Probably the best gratuitous shortcodes plugin around. We're going to utilise it to add together some boosted cool content blocks to our previously created landing page structure.)
Some more details about the plugins:
- They both work with your electric current WordPress theme.
- You can use them on posts and pages.
- You do all of your work inside the standard editing screen in WordPress.
- The output is responsive and mobile-friendly.
- You can use widgets every bit content blocks in SiteOrigin.
- There's version control in SiteOrigin.
Important landing folio elements
About quality landing pages unremarkably have the following elements:
- Good headline presentation – big and assuming.
- Minimal side elements, such every bit the sidebar, footer content, or anything else that can be distracting to the visitor.
- Clear focus on just one unmarried objective. This can exist a sale, an affiliate link click, or a newsletter subscription (usually).
- Story-driven presentation – where the visitor is taken by the hand through every section of the page until they reach a terminal call to activity.
- The call to activeness – the enquire. This element tells the visitor what to exercise.
- Adept visual separation of the private sections on the page.
Nosotros could probably list even more requirements, just I call back this volition exist enough for our quick demo hither.
1. Installing the plugins
Zippo fancy here, just become them through the WordPress installer (wp-admin > Plugins > Add New) or via WordPress.org (links above). Install and activate.
(Don't forget that you lot need not only the main SiteOrigin plugin, but likewise the boosted widgets parcel.)
2. Creating a page template
The beginning decision to make is whether you're going to create your landing page as a WordPress mail service or a page.
Technically speaking, there's no difference. Simply proceed in mind that about themes allow y'all to use a full-width (no-sidebar) template for pages, whereas very few deliver such functionality for posts.
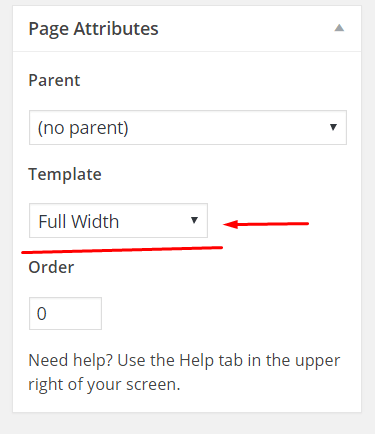
And so in the end, you probably want to piece of work with a new page.
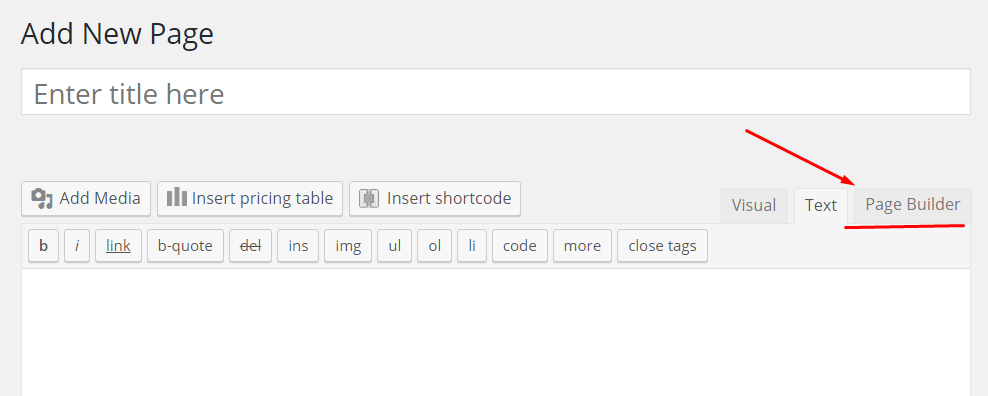
One time on the "Add New Folio" screen, switch to the "Page Architect" right abroad:
From at that place, you have the option to either start building something from scratch, or use one of the pre-built layouts.
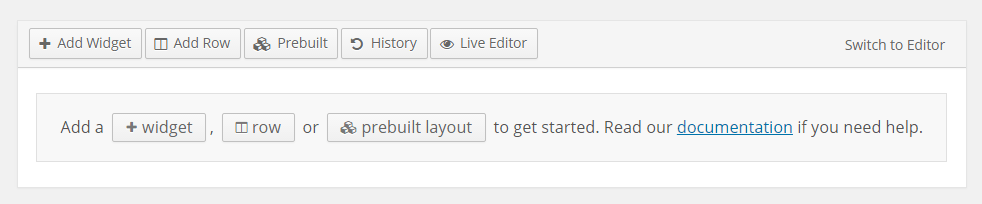
For the purpose of this tutorial, we're going to build a landing page in WordPress from the footing up, but I highly encourage you to check out those pre-built layouts also, and see what sort of mechanisms sit down nether the hood there. Each of those layouts is perfectly editable, nothing is hidden.

In that location are ii main container types in SiteOrigin:
- rows,
- widgets.
Basically, to put any kind of content on your landing folio, you first need to create a row, and so add together your content as a widget.
Hither's how:
3. Creating rows for your landing page
Okay, so to get started, you need a general idea of what yous want your landing page to look like.
Here's a rough structure I came up with:

As you can see, nothing too fancy.
Since I need a skilful example to work with here, the purpose of this landing folio volition be to promote my girlfriend's (non-existent) guide on "how to stitch a absurd beanie hat in less than 20 minutes."
So okay, by the looks of things, I need four individual rows:
- the primary headline department,
- the details section – the i that features those three images,
- the about section,
- the opt-in section.
Starting from the top:
The headline row
The headline row is a very simple affair to practise, yet information technology tin can look truly awesome!
Hither's how:
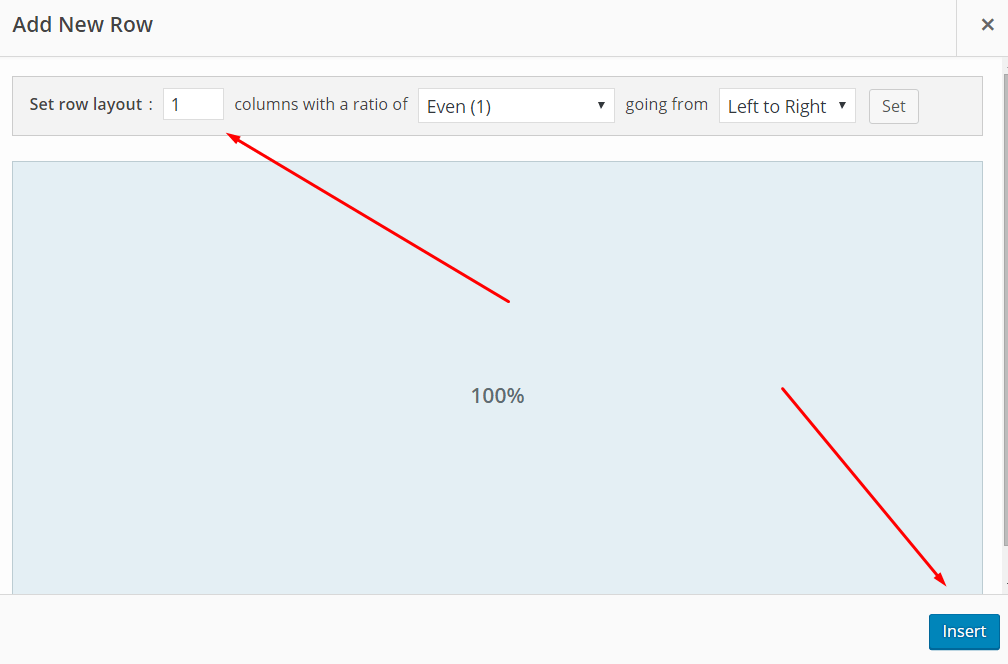
Click the row push button in the primary SiteOrigin interface:

Then, change the layout to 1 column, and click Insert:
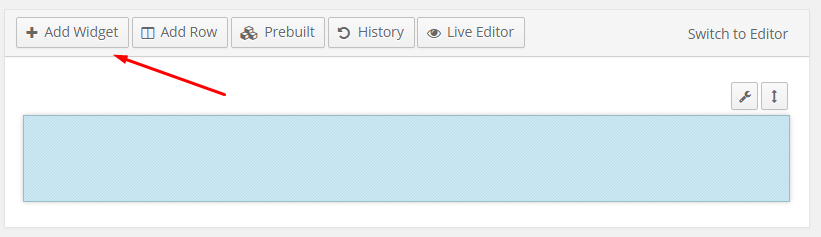
Now, let'due south add together a new widget. Click the Add together Widget push button:
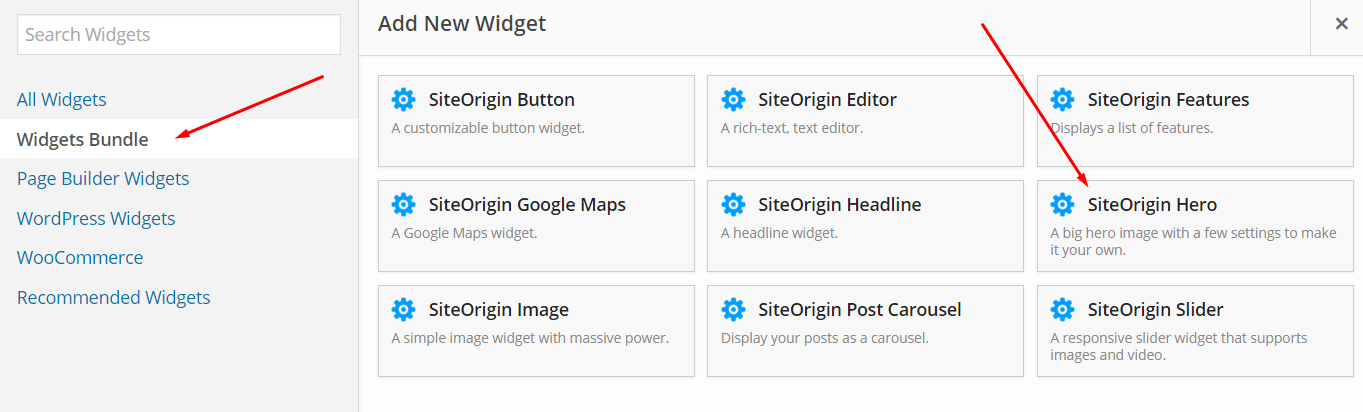
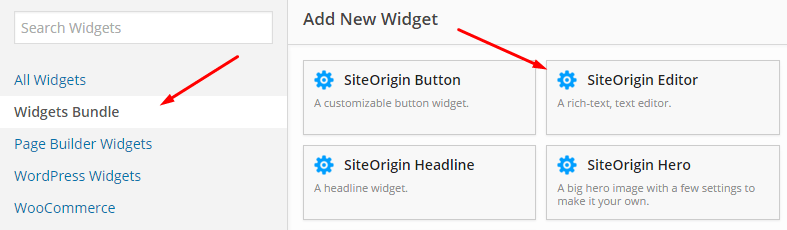
Then switch to "Widgets Package," and select the "SiteOrigin Hero" widget:
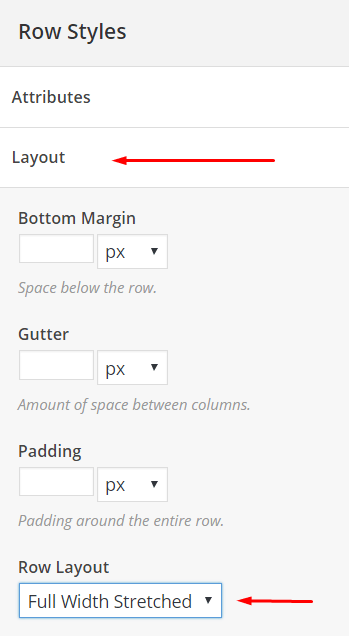
Click the wrench icon in the upper right corner of your new row:

From there, go to the "Layout" section in the right sidebar, and from the "Row Layout" drib-downward, select "Full Width Stretched." This volition stretch the whole row, ultimately making information technology possible to have a total-width image in the groundwork.
However, to attain the total-width event, we demand a couple more steps. First, edit the "Hero" widget:

There, add together a new "Hero frame":
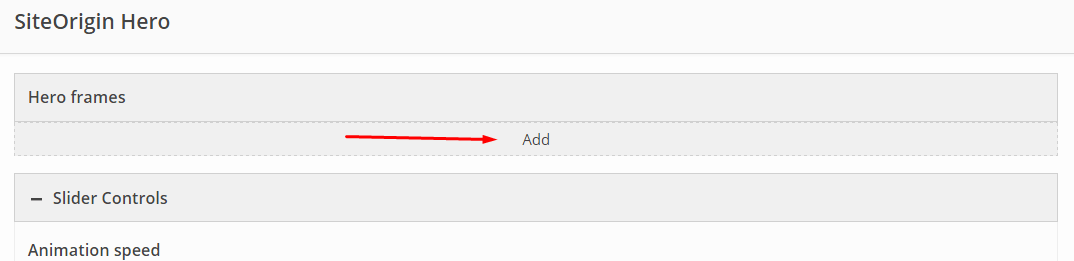
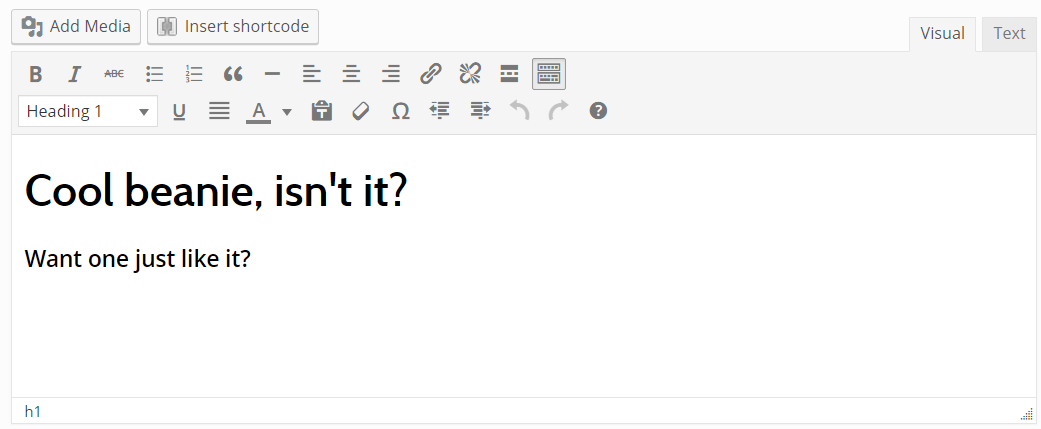
Click on that new frame to edit it:

This is where you can put your headline.
Here'due south mine:
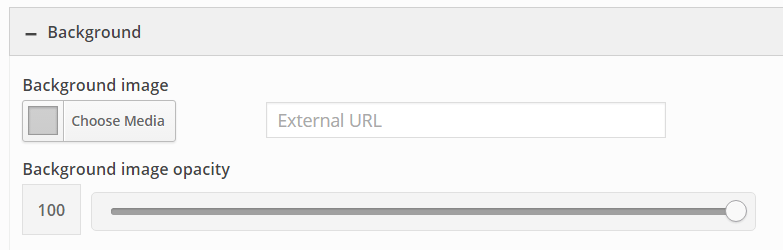
Correct below that whole frame block, there'southward a section chosen "Background." In information technology, you lot tin set your total-width background image. Information technology works just like whatever other slice of media in WordPress. But click the "Choose Media" push, and upload an epitome from your computer.
After yous're washed, simply click the main "Done" push button in the lower right corner. With this washed, you can click the "Preview" push of your whole page.
Here's what my landing page looks like at the moment:

Cool! That's a skilful starting time!
The details row
This row is where I placed those three small images in my blueprint. It's also the showtime place where we're going to use the Shortcodes Ultimate plugin.
Here's how I'm going to go about creating it:
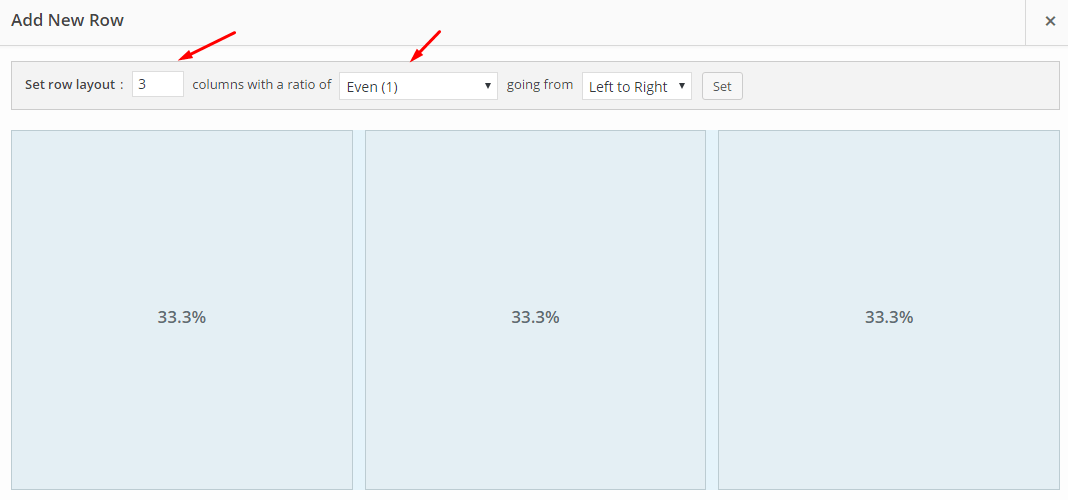
Start past adding a new row (only like previously). Simply this fourth dimension, I want three columns, and I want them to be even:
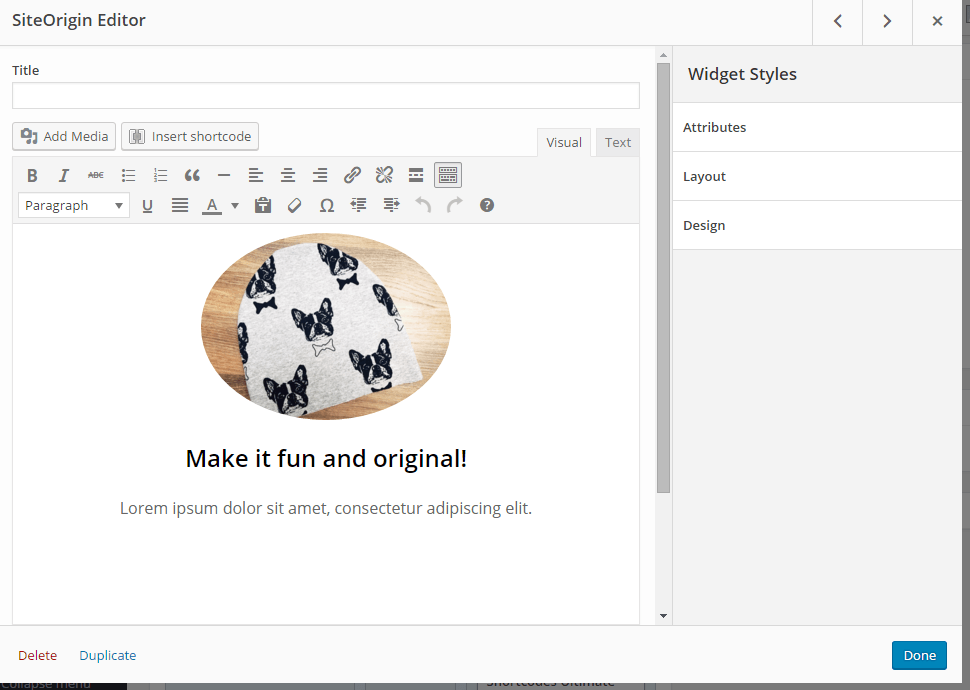
Then, in each i, I'm going to add a uncomplicated widget called "SiteOrigin Editor":
This is basically a standard editor window with all of WordPress' text editing capability. What I'm going to utilize it for is a very simple content block – just an image and some text. Similar and then:
Adjacent, I'thousand going to add some Shortcodes Ultimate magic here! My goal is to make that image announced on the screen after a slight delay and using a simple animation.
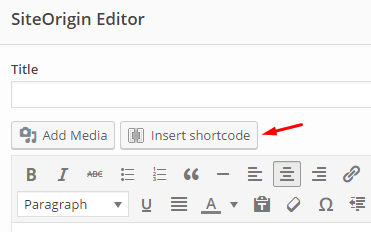
To make that happen, I click the "Insert Shortcode" push near the acme of the editor screen:
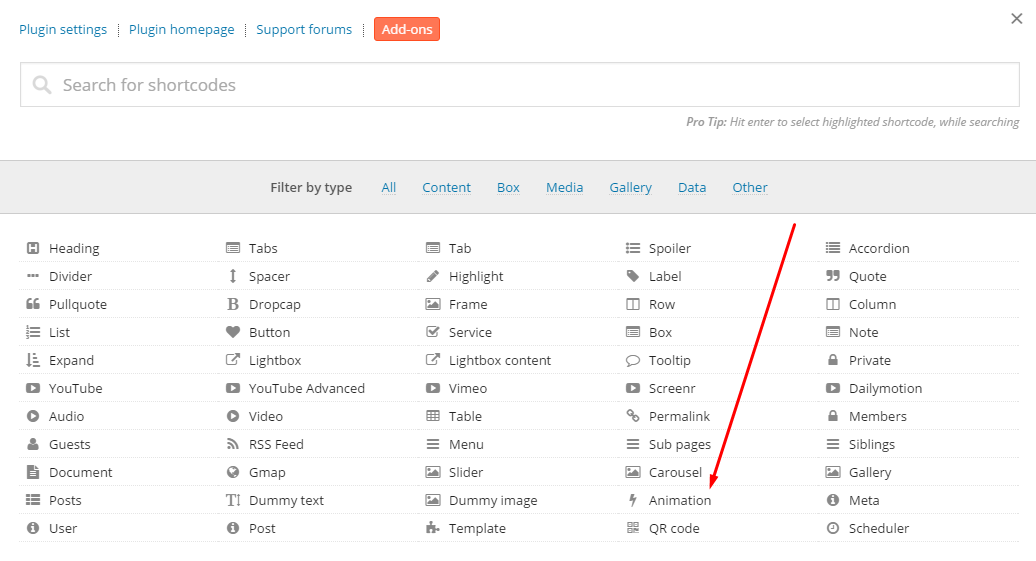
What yous'll see is all of Shortcodes Ultimate'southward shortcodes. This might be a bit intimidating at showtime, just it's really a very user-friendly system, and there are some really good docs available.
The shortcode I'm going to use is chosen "Animation":
Feel free to experiment with the options bachelor in that config window until you see something that you really like. There'due south a small "Live Preview" button at the bottom to assist you out.
For now, however, we're going to speed things upwardly, and just use the ready-fabricated shortcode correct within the editor window. Simply identify the following code around your paradigm:
[su_animate blazon="flipInY" filibuster="1"]YOUR_IMAGE_HERE[/su_animate] Practice information technology like this (and so the shortcode is around the image):
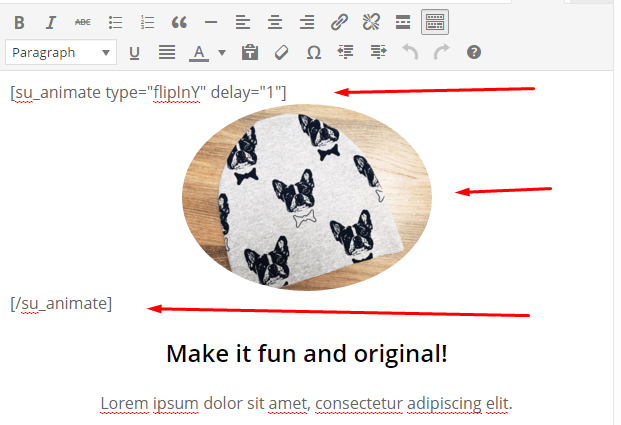
The important thing to notice there is that the filibuster parameter is fix to 1 2nd.
Next, I create ii more than editor blocks just similar this ane, and add together similar shortcodes there, but I'm assigning unlike delays to them (2 seconds for the 2nd block, and 3 seconds for the third). This will give us a squeamish progression.
This is what my new row looks similar right now:

And this is what information technology looks like on the landing page:

At this indicate, I should probably also mention that every widget and every row tin can be arranged with drag-and-drib. This makes things really straightforward for editing work. Here'southward a demo:

The "Nigh" row
The "Near" row uses basically the same widget elements – "SiteOrigin Editor" blocks – but it has ii columns instead of three.
So, create a new row, and set it to incorporate two columns. Then prepare the columns to be divided according to the golden ratio, and from "Right to Left." Like so:
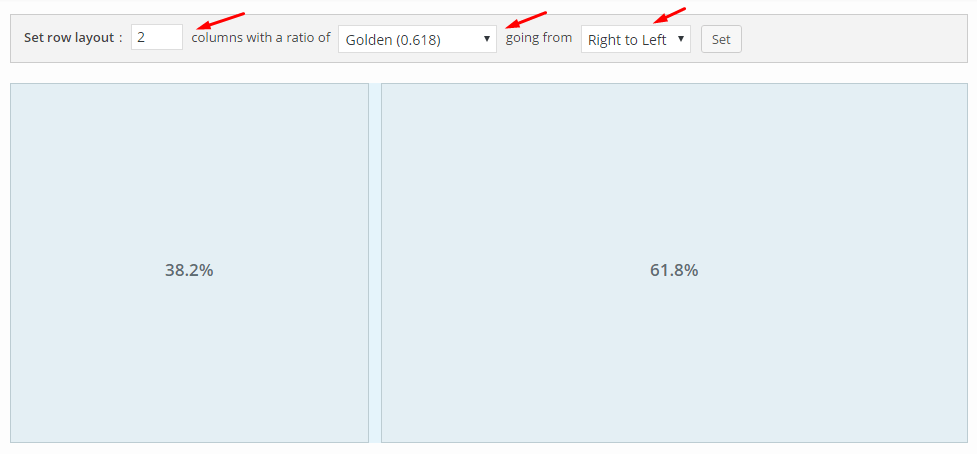
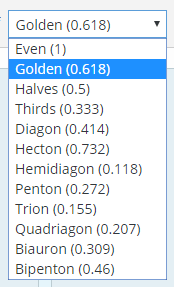
SiteOrigin is very helpful hither. The golden ratio is only i of many pre-fabricated ratios to choose from. Feel complimentary to experiment with the others as well:
The content of these columns is pretty straightforward too. I just use it to hold one "SiteOrigin Editor" widget each, and some "Nearly" info inside:

Finally, here's what it looks similar on the landing page:

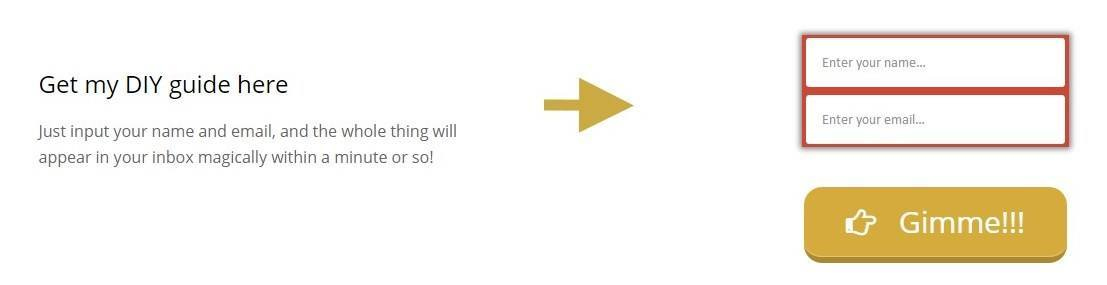
The opt-in row
This is our terminal row, and actually the most important row for any landing page – it's where the call to action sits.
I'm using a three-column row, and starting with the ratio set to "Even." Nonetheless, I'll adjust the eye column right away to take upwardly only 20% of the whole width. Like so:

As you tin come across, SiteOrigin makes it really easy to suit whatsoever column's width. Yous but demand to click the current width and blazon in whatever value you desire.
Now, my columns:
- The first column is where I place a short slice of text that invites people to leave their email addresses to become the download. Only a simple "SiteOrigin Editor" widget here.
- The 2d block is also nothing fancy. I just use an arrow icon to point to the opt-in form that'due south going to be placed on the right. Once again, done with the "SiteOrigin Editor" widget.
- The tertiary cavalcade is where the magic happens. This is where I use a widget from my e-mail delivery plugin. That widget volition take intendance of placing a working opt-in form right on the page and hooking it up to my electronic mail software (check with your ain email provider to find out how to make this role work).
In the terminate, this is what my final row looks like in the drag-and-drop landing page architect:

And this is what it looks like on the landing page in WordPress:
The landing page all together
At this stage, the work is done and yous can enjoy your new landing folio congenital with some drag-and-drop trickery. Mine has turned out pretty nice, I think. Bank check information technology out:
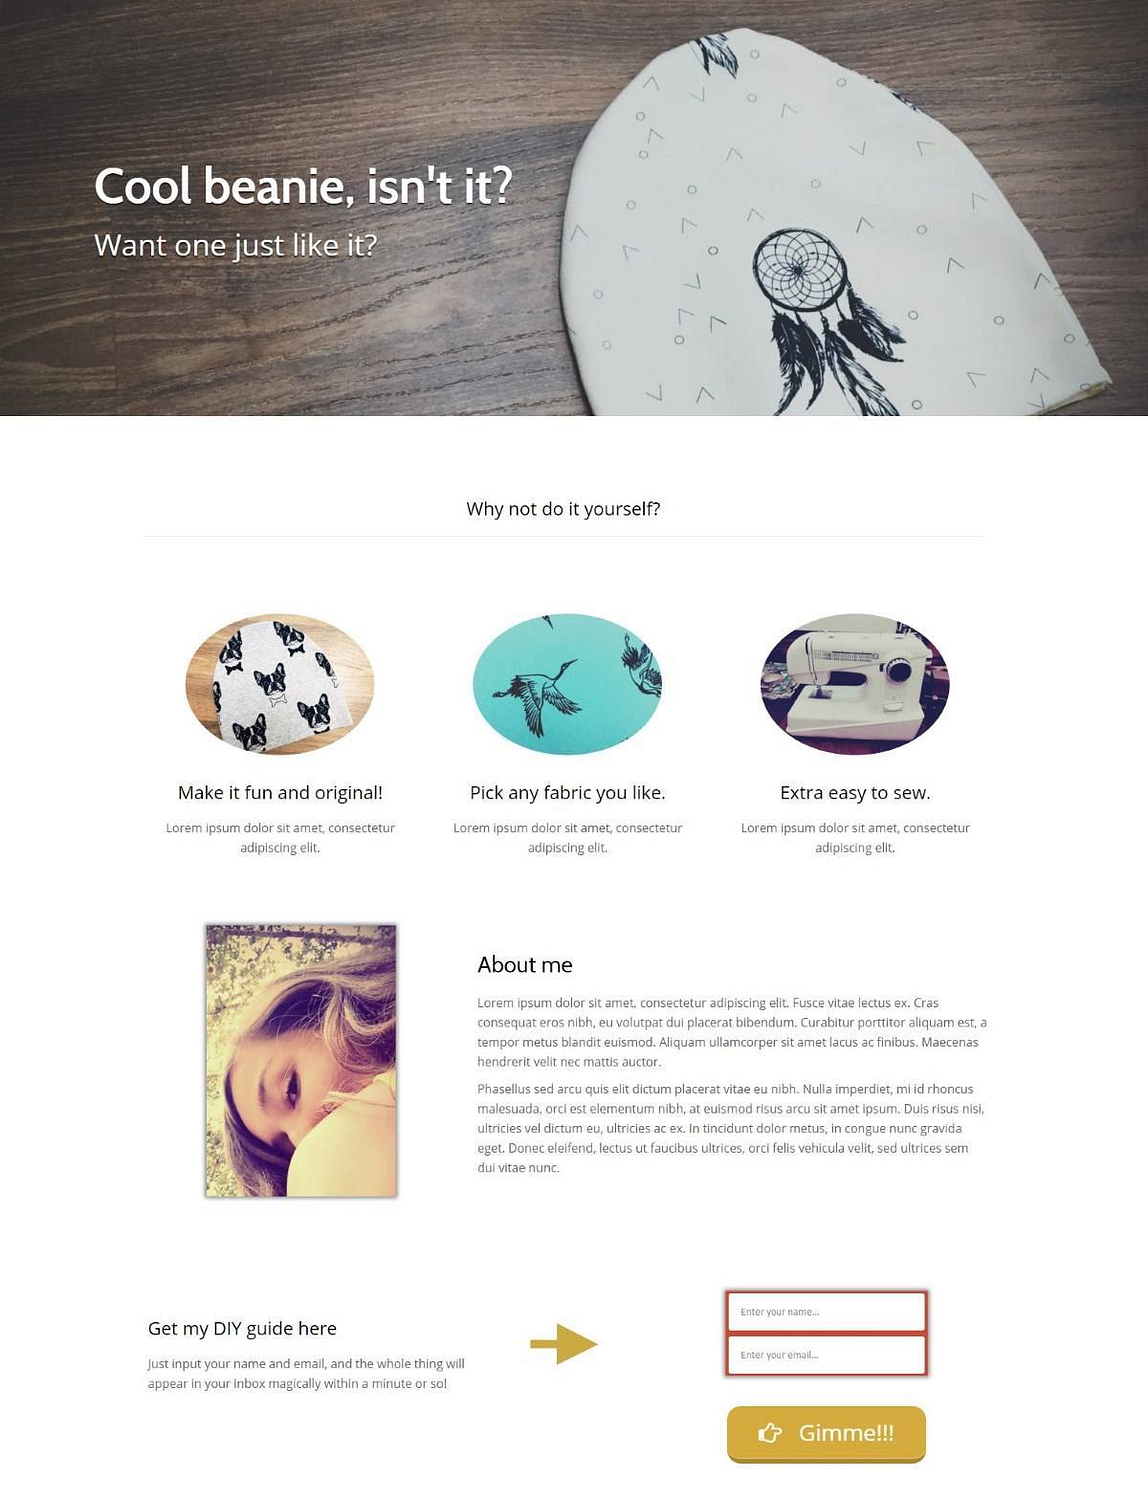
Building something similar this is really simple with SiteOrigin and Shortcodes Ultimate. Once yous accept your idea, you don't need a designer'south help. The fact that yous tin create all of that on your own makes those plugins uber-helpful.
Finally, the procedure of building a landing page described here works with all of our themes, so the but matter you're restricted past is your creativity.
Feel complimentary to view this entry in our Themeisle docs for a slightly shorter version of this guide.
But what exercise you recollect? Do you accept whatsoever questions on how this process works? Or perchance you have a landing page of your own you'd similar to show the states…
Free guide
5 Essential Tips to Speed Upward
Your WordPress Site
Reduce your loading time by even fifty-lxxx%
just by following simple tips.
Download gratuitous guide
smiththerecomed1949.blogspot.com
Source: https://themeisle.com/blog/landing-page-with-drag-and-drop-content-builder/
0 Response to "Build Wordpress Pages Individually Drag and Drop and Upload to Wordpress"
Post a Comment